Introduction
Radiant floor heating is a popular and efficient way to keep your home warm during the colder months. Unlike traditional heating methods, radiant floor heating warms the space from the ground up, providing a more even and comfortable heat distribution. While professional installation can be costly, a DIY approach is a viable option for those with basic handyman skills. In this article, we’ll guide you through the process of installing radiant floor heating in your home, ensuring a cozy and energy-efficient living space.
Understanding Radiant Floor Heating
Before diving into the DIY installation process, it’s essential to understand how radiant floor heating works. This heating system involves running warm water through tubes or heating cables installed beneath the floor surface. The heat generated radiates upward, warming the room and providing a consistent and comfortable temperature.
Materials and Tools
Before starting the installation, gather the necessary materials and tools. You’ll need:
- PEX tubing or electric heating cables
- Insulation (foam board or reflective foil)
- Plywood or cement backer board
- Flooring material (tiles, hardwood, laminate, etc.)
- Manifold and pump for water-based systems
- Thermostat
- Pipe and cable staples
- Pipe or cable staples
- Pipe or cable installation tools
- Pipe or cable spacing guides
Step 1: Planning
Begin by creating a detailed plan for your radiant floor heating system. Consider the layout of the rooms, the type of flooring, and the specific needs of each space. Decide whether you want a water-based (hydronic) or electric system, as the installation process may vary.
Step 2: Subfloor Preparation
For water-based systems, install insulation beneath the subfloor to prevent heat loss. Use foam board or reflective foil for optimal insulation. For electric systems, lay down a layer of plywood or cement backer board over the subfloor.
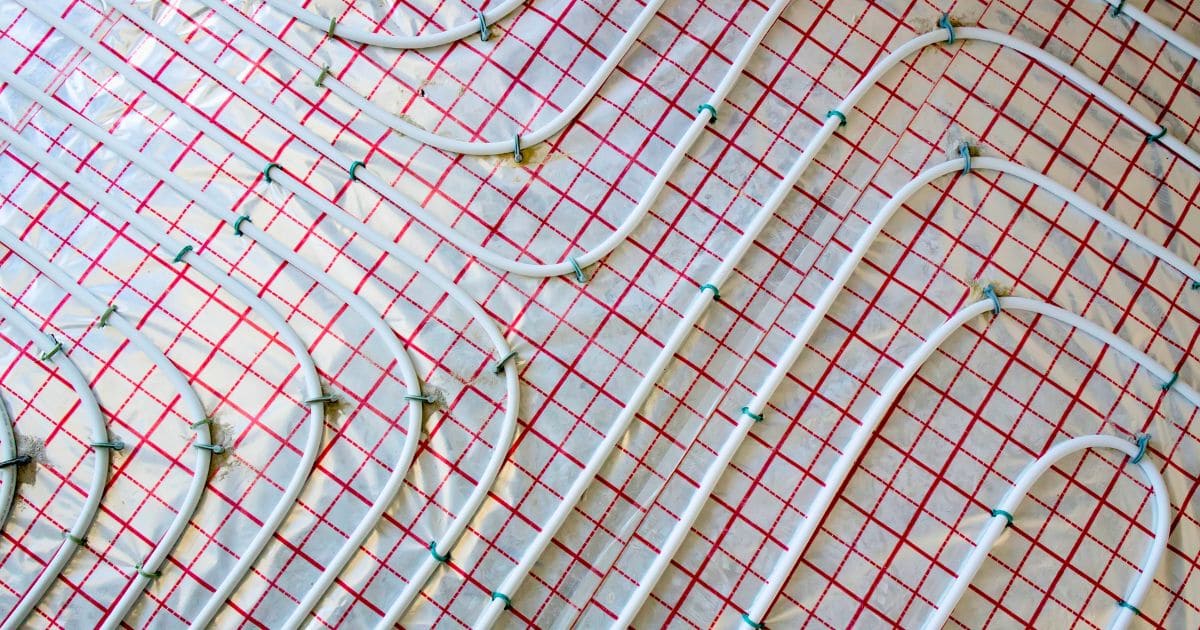
Step 3: Installing Tubing or Cables
For water-based systems, install PEX tubing in a serpentine pattern across the floor, leaving a consistent spacing between the loops. Secure the tubing with pipe staples. If opting for electric systems, follow the manufacturer’s guidelines for spacing and install the heating cables evenly across the floor.
Step 4: Connecting to the Heat Source
For water-based systems, connect the PEX tubing to a manifold, which will distribute the heated water. Install a pump to circulate the water through the system. For electric systems, connect the heating cables to the thermostat following the manufacturer’s instructions.
Step 5: Flooring Installation
Once the tubing or cables are in place, install the flooring material of your choice. Tiles and hardwood are popular options for radiant floor heating systems, as they conduct and retain heat effectively.
Step 6: Testing and Fine-Tuning
After completing the installation, test the system to ensure everything is functioning correctly. Make any necessary adjustments to the thermostat settings or water flow rates to achieve the desired temperature.
Conclusion
DIY radiant floor heating can be a rewarding project, providing long-term comfort and energy efficiency in your home. By carefully planning, gathering the right materials, and following these step-by-step instructions, you can enjoy the warmth of a radiant floor heating system without the need for professional installation. Remember to prioritize safety, adhere to local building codes, and consult with experts if needed during the process. With a little effort and attention to detail, you’ll be able to create a cozy and inviting living space for years to come.