Introduction
Rubber flooring is a versatile and durable option for various spaces, including gyms, play areas, and home workout spaces. While installing rubber flooring can enhance the aesthetics and functionality of a space, cutting it to fit specific dimensions is a crucial step in the installation process. In this comprehensive guide, we will explore the various techniques and tools needed to cut rubber flooring effectively.
Understanding Rubber Flooring
Before delving into the cutting process, it’s essential to understand the characteristics of rubber flooring. Rubber flooring comes in rolls, tiles, or mats and is available in various thicknesses and densities. It is a resilient material, providing comfort underfoot, excellent impact resistance, and noise reduction. Knowing the specific type of rubber flooring you are working with will influence the cutting method you choose.
Tools for Cutting Rubber Flooring
- Utility Knife:
- A sharp utility knife is a fundamental tool for cutting rubber flooring. Ensure the blade is fresh and sharp to achieve clean and precise cuts.
- Straight Edge or T-Square:
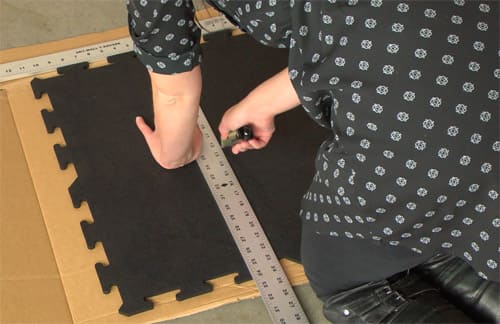
- A straight edge or T-square helps create straight and accurate cutting lines, ensuring that the rubber flooring fits seamlessly into the designated space.
- Straight-Blade Shears:
- Electric or manual straight-blade shears are suitable for cutting straight lines effortlessly. They work well for thinner rubber flooring materials.
- Band Saw:
- A band saw with a fine-toothed blade is effective for cutting rubber flooring, especially in larger installations. It allows for intricate and curved cuts.
- Jigsaw:
- A jigsaw equipped with a fine-toothed blade is suitable for cutting curves and intricate shapes in rubber flooring.
- Rubber Flooring Cutter:
- Specialized rubber flooring cutters are available and can simplify the cutting process. These tools are designed specifically for rubber flooring and provide clean, straight cuts.
Techniques for Cutting Rubber Flooring
- Measuring and Marking:
- Measure the space where the rubber flooring will be installed and mark the cutting lines using a straight edge or T-square. Double-check your measurements to avoid errors.
- Straight Cuts with Utility Knife:
- For straight cuts, use a utility knife and a straight edge. Score the rubber flooring several times, gradually deepening the cut with each pass. Finish by bending the material along the cut line to complete the separation.
- Using Straight-Blade Shears:
- Straight-blade shears are ideal for straight cuts, especially in thinner rubber flooring. Align the shears with the marked line and make steady, even cuts.
- Curved Cuts with Jigsaw or Band Saw:
- For curved or intricate cuts, use a jigsaw or band saw. Secure the rubber flooring and follow the marked lines, moving the tool steadily to achieve smooth curves.
- Rubber Flooring Cutter:
- If you have access to a rubber flooring cutter, follow the manufacturer’s instructions for precise and efficient cutting. These tools are designed to minimize effort and produce clean cuts.
Safety Precautions
- Protective Gear:
- Wear appropriate protective gear, including safety glasses and gloves, to safeguard against any potential injuries during the cutting process.
- Well-Ventilated Area:
- Work in a well-ventilated area, especially if using power tools, to minimize exposure to dust and fumes.
Conclusion
Cutting rubber flooring requires careful consideration of the type of material and the desired outcome. By choosing the right tools and techniques, you can achieve clean and accurate cuts for a professional-looking installation. Whether you opt for a utility knife, straight-blade shears, or specialized tools like a rubber flooring cutter, following the guidelines in this comprehensive guide will ensure a successful and visually appealing rubber flooring installation.


