Introduction: Navigating the complexities of electrical wiring can be daunting, especially when it comes to 4-way light switches. These switches are essential for controlling a single light fixture from multiple locations, offering convenience and flexibility in lighting setups. In this comprehensive guide, we’ll delve into the intricacies of 4-way light switches, providing detailed explanations and diagrams to simplify the process.
Understanding the Basics:
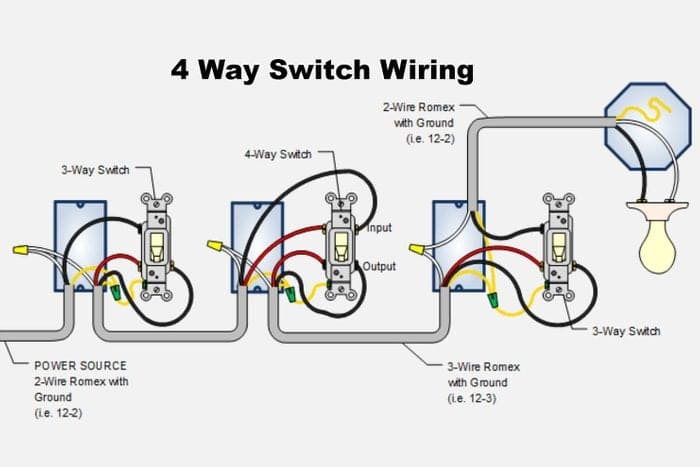
Before diving into the wiring diagrams, it’s crucial to grasp the fundamental concepts behind 4-way light switches. Unlike traditional single-pole switches, which have only two positions (on and off), 4-way switches allow control from three or more locations. They work in conjunction with two 3-way switches to create a multi-location lighting control system.
Components Needed:
To wire a 4-way light switch successfully, you’ll need the following components:
- 4-way switch(es)
- 3-way switch(es)
- Electrical wire (typically 14/3 or 12/3 gauge)
- Wire nuts
- Electrical tape
- Screwdriver
- Voltage tester
Wiring Diagram: Below is a wiring diagram illustrating the connections for a 4-way light switch setup:
Step-by-Step Guide: Now, let’s break down the wiring process into simple steps:
- Turn Off Power: Before beginning any electrical work, turn off the power to the circuit at the breaker box.
- Identify Existing Wiring: Determine which wires are currently connected to the existing switches. You should typically find a black (hot), a white (neutral), and a bare copper (ground) wire.
- Install 4-Way Switch: Connect the wires to the appropriate terminals on the 4-way switch. Refer to the wiring diagram for guidance.
- Connect Traveler Wires: Run additional wires (known as traveler wires) between the 4-way switch and the two 3-way switches. Use the appropriate wire nuts to secure the connections.
- Install 3-Way Switches: Connect the traveler wires to the designated terminals on the 3-way switches. Again, refer to the wiring diagram for reference.
- Test the Circuit: Once all connections are made, turn the power back on and test the circuit using a voltage tester. Ensure that the switches control the light fixture from all desired locations.
- Secure and Label: After verifying that the circuit is functioning correctly, secure all connections with electrical tape and wire nuts. Consider labeling the switches for future reference.
Conclusion:
Mastering the wiring of 4-way light switches is a valuable skill for any DIY enthusiast or electrician. By understanding the principles behind these switches and following the provided diagrams and instructions, you can confidently tackle multi-location lighting projects with ease. Remember to always prioritize safety and consult a professional if you encounter any difficulties. With practice and patience, you’ll become proficient in navigating the complexities of electrical wiring.