Introduction:
The kitchen soffit, a dropped ceiling or bulkhead above the kitchen cabinets, was once a popular design element. However, modern kitchen trends often lean towards open and spacious layouts, prompting homeowners to consider removing the soffit to achieve a more contemporary look. If you’re looking to embark on this DIY project, this guide will provide you with a detailed, step-by-step process to successfully remove a kitchen soffit. Ensure you follow each step carefully and prioritize safety throughout the entire process.
Before You Begin:
- Safety First:
- Always wear appropriate safety gear, including safety glasses and gloves.
- If the soffit contains electrical wiring, turn off the power to the kitchen at the circuit breaker.
- Assessment:
- Examine the soffit to determine if it contains utilities such as electrical wiring, plumbing, or HVAC components. If so, consult with a professional before proceeding.
- Permits:
- Check with your local building department to determine if permits are required for this type of renovation. Obtain necessary permits before starting the project.
Step-by-Step Guide:
1. Clear the Area:
- Remove any items from the cabinets and countertops beneath the soffit.
- Cover the appliances and furniture to protect them from dust and debris.
2. Identify Utilities:
- Carefully examine the soffit to identify any electrical wires, plumbing, or HVAC components. Mark their locations.
3. Turn Off Power:
- If electrical wiring is present, turn off the power at the circuit breaker. Consider hiring a licensed electrician if you’re unsure about handling electrical components.
4. Remove Trim:
- Using a utility knife, carefully cut away any caulk or paint around the edges of the soffit.
- Gently pry off any trim using a pry bar or a utility knife.
5. Cut Drywall:
- Create an opening in the drywall to expose the structure of the soffit.
- Use a drywall saw to cut along the edges of the soffit. Be cautious not to damage any hidden utilities.
6. Disconnect Utilities:
- If utilities are present, carefully disconnect them according to local codes and regulations.
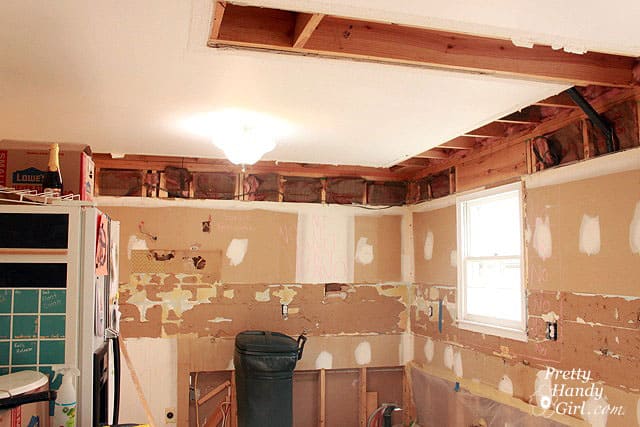
7. Remove Drywall:
- Continue cutting and removing the drywall until the entire soffit is exposed.
- Dispose of the drywall responsibly.
8. Structural Support:
- Assess the structural support for the removed soffit. If it was load-bearing, consult with a structural engineer to ensure the structural integrity of your kitchen.
9. Patch and Finish:
- Patch any holes or gaps in the ceiling and walls with joint compound.
- Sand and finish the patched areas to match the existing surfaces.
10. Paint:
- Paint the patched areas to blend seamlessly with the rest of the kitchen.
Conclusion:
Removing a kitchen soffit can significantly transform the look and feel of your space, creating a more open and modern environment. However, it’s crucial to approach the project with careful planning, attention to detail, and a focus on safety. If you encounter challenges or are uncertain about any aspect of the process, don’t hesitate to seek professional assistance. With the right tools, knowledge, and patience, you can successfully remove a kitchen soffit and enjoy the enhanced aesthetics of your revamped kitchen.