
- Preparation for Installing Backsplash in Bathroom
- Choosing the Right Materials for Bathroom Backsplash
- Step-by-Step Installation Process
- Common Challenges and How to Overcome Them
- Real-Life Case Study: Bathroom Backsplash Installation
- Expert Tips for Maintaining Your Backsplash
1. Preparation for Installing Backsplash in Bathroom
Before diving into how to install a backsplash in the bathroom, thorough preparation is crucial. The success of your backsplash depends on a solid foundation and clear planning. Start by measuring the area precisely where the backsplash will be installed. A common mistake is underestimating space, which can lead to material shortages or wasted product.
Next, remove any existing backsplash, clean the wall surface thoroughly, and repair any imperfections like holes or uneven areas. This step ensures the adhesive sticks properly and the tiles or panels lay flat. Additionally, gather all necessary tools and materials ahead of time — this typically includes tile adhesive, spacers, grout, a tile cutter, and safety gear.
Preparation is more than just physical tasks; it also means deciding on the design style you want. Whether you prefer classic subway tiles or modern glass panels, having a clear vision helps streamline the entire process.
1.1 Importance of Proper Wall Preparation
Many DIY enthusiasts underestimate wall preparation, but a poorly prepared wall leads to tile lifting and grout cracking. For bathrooms, moisture-resistant backer boards are often recommended as a base layer, especially in wet zones, to prevent mold and water damage.
1.2 Tools Checklist for Bathroom Backsplash Installation
Having a complete toolkit makes installation smoother and safer. Essential items include a notched trowel for adhesive application, tile spacers for consistent gaps, a wet saw or tile cutter, a level, a sponge for grout cleaning, and safety glasses.
2. Choosing the Right Materials for Bathroom Backsplash
Selecting the right backsplash material plays a big role in the look and longevity of your bathroom upgrade. Popular options include ceramic tiles, glass tiles, natural stone, and peel-and-stick vinyl tiles. Each has its pros and cons, especially considering the humid environment of a bathroom.
Ceramic tiles are a go-to for durability and water resistance, while glass tiles add a reflective quality that brightens the space. Natural stone offers a luxurious feel but requires sealing to avoid water damage. For a quicker, budget-friendly option, peel-and-stick tiles are easy to install but less durable in the long term.
2.1 Matching Material to Bathroom Style
The material you choose should complement your bathroom’s overall aesthetic. For example, a rustic bathroom may benefit from textured stone, while a contemporary bathroom shines with sleek glass tiles. Consider how the backsplash material will work with your countertop, fixtures, and paint colors.
2.2 Durability and Maintenance Considerations
Since bathrooms are humid, prioritize materials that resist moisture and are easy to clean. Tiles with smooth surfaces typically require less maintenance. Also, grout quality matters—a waterproof grout can significantly extend the lifespan of your backsplash.
3. Step-by-Step Installation Process
Now that preparation and materials are set, the heart of the project is how to install a backsplash in the bathroom effectively. The installation involves several careful steps, each essential to achieve a professional finish.
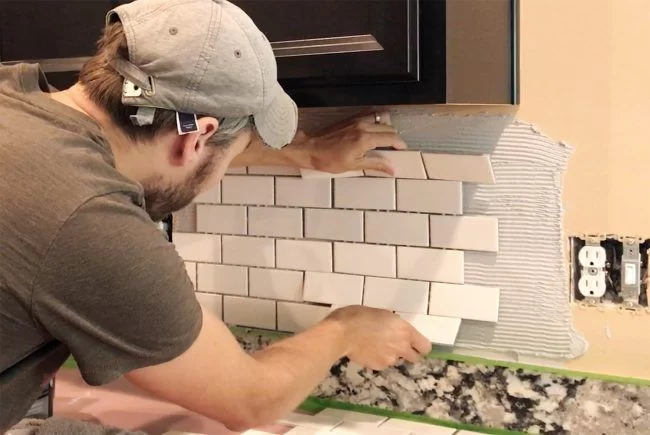
3.1 Applying Adhesive and Placing Tiles
Start by applying tile adhesive to a small section of the wall using a notched trowel. Work in manageable areas to prevent the adhesive from drying too quickly. Press the tiles firmly into place, using spacers to maintain even gaps between tiles. Use a level frequently to keep your backsplash straight.
3.2 Cutting Tiles to Fit
Walls aren’t always perfectly square, and you’ll likely need to cut some tiles to fit around corners or outlets. Using a tile cutter or wet saw, carefully measure and trim tiles. Always wear safety glasses and follow tool instructions to avoid accidents.
3.3 Grouting and Finishing Touches
Once the adhesive dries, remove spacers and apply grout between the tiles using a rubber float. Push grout firmly to fill all gaps, then clean off excess grout with a damp sponge before it hardens. After grout cures, consider sealing it to protect against moisture and stains.
4. Common Challenges and How to Overcome Them
Even with careful planning, installing a bathroom backsplash can bring challenges. Uneven walls, tricky corners, and tile breakage are common issues. Address uneven walls by using a self-leveling compound before tiling. For corners, use pre-made corner trims or carefully cut tiles to fit precisely.
If tiles crack during cutting or installation, keep extra tiles handy to replace damaged pieces. Patience and precision are key—rushing can lead to costly mistakes. Also, ensure proper ventilation during installation to help adhesives and grout cure efficiently.
5. Real-Life Case Study: Bathroom Backsplash Installation
A homeowner named Sarah recently tackled installing a backsplash in her master bathroom to modernize the space without a full remodel. She chose glass mosaic tiles for their reflective quality and moisture resistance. Initially nervous about cutting tiles, Sarah took extra time practicing on spare pieces and used tile spacers meticulously to maintain uniformity.
Her preparation paid off—her backsplash turned out even and vibrant, transforming the bathroom into a brighter, more inviting area. Sarah’s experience highlights the importance of patience, proper preparation, and choosing the right materials. For those looking for recommended products and tools like the ones Sarah used, Improvement offers a curated selection ideal for bathroom backsplash projects.
6. Expert Tips for Maintaining Your Backsplash
After investing time and effort into installation, maintaining your bathroom backsplash is essential to keep it looking fresh. Regularly wipe down tiles with a mild cleaner to prevent soap scum buildup. Inspect grout lines periodically for cracks or discoloration and reseal grout annually to maintain waterproofing.
Avoid abrasive cleaners that can damage tile surfaces, and quickly address any water leaks behind the backsplash to prevent mold growth. Following these maintenance tips ensures your backsplash stays beautiful and durable for years.
If you want trusted advice on maintenance products or professional installation services, Improvement is a great resource for finding expert recommendations tailored to your bathroom needs.


