
- understanding-diy-wall-mounted-tv-stand-essentials
- step-by-step-guide-how-to-build-a-diy-wall-mounted-tv-stand
- creative-design-ideas-and-practical-tips
- real-cases-and-common-mistakes-to-avoid
- expert-advice-and-trusted-resources
1. Understanding DIY Wall-Mounted TV Stand Essentials
For many homeowners, the decision to build a DIY wall-mounted TV stand comes from the need for both style and practicality. A well-designed wall-mounted TV stand isn’t just about saving space—it transforms the room, adds a touch of modernity, and creates a personalized media experience.
Before you get started, it's crucial to understand the basics of how to mount a TV safely and choose the right materials. Think of your wall-mounted TV stand as the backbone of your living room's entertainment zone. Using strong brackets, solid wood or engineered panels, and high-quality fasteners ensures both safety and style. Many people worry about damaging their walls or choosing the wrong anchor points, but with careful planning, these concerns are easy to overcome.
In recent years, creative DIY wall-mounted TV stands have trended on social media, with users sharing their success stories and even some funny fails—like the viral video of a couple whose TV slowly tilted during movie night, only to find out they hadn’t hit a single stud! This just highlights the importance of solid prep work and learning from others’ experiences.
2. Step-by-Step Guide: How to Build a DIY Wall-Mounted TV Stand
Building your own DIY wall-mounted TV stand can be straightforward with the right approach. Here’s how to ensure your project turns out safe, secure, and stylish:
2.1 Planning Your Project
First, measure your TV and determine the ideal viewing height based on your seating area. Sketch your TV wall design, considering whether you want shelving, LED lighting, or cable management features. Many successful DIYers recommend laying out painter’s tape on the wall to visualize the final look.
2.2 Choosing the Right Materials and Tools
Select materials that match your room's style—solid oak for a rustic look, sleek white laminate for modern interiors, or reclaimed wood for eco-conscious projects. Essential tools include a stud finder, level, power drill, and a sturdy wall mount bracket. Never skip the stud finder; drywall anchors alone aren’t enough for heavy TVs.
2.3 Installation Process
Mark your wall's studs and double-check with a level. Secure the wall mount bracket using lag bolts. Attach the TV following the mount instructions, then install any shelves or cabinets as needed. Conceal cables using in-wall kits for a clean finish. If you feel unsure at any point, ask a friend for a second opinion—sometimes, a fresh pair of eyes spots things you might miss.
If you need reliable products or expert installation help, check out Improvement for top-rated TV mounts, shelving, and even custom solutions.
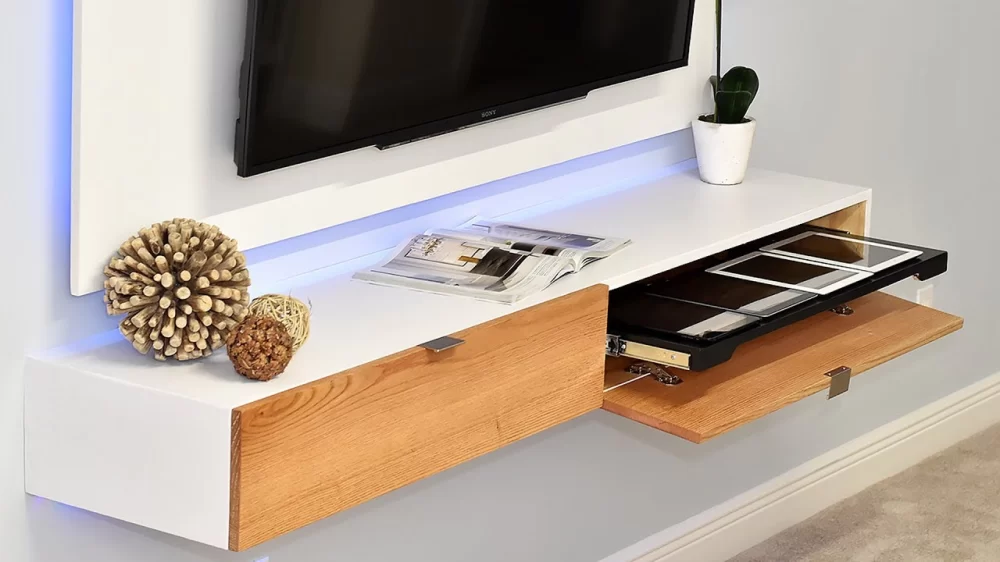
3. Creative Design Ideas and Practical Tips
3.1 Blending Function and Style
A wall-mounted TV stand is much more than a bracket. Consider adding floating shelves for media players, books, or decor. Hidden LED lighting behind your TV can create an atmospheric “halo” effect, making movie nights more immersive. Some creative DIYers have integrated soundbars into their wall-mounted TV setups, creating a seamless entertainment hub.
3.2 Maximizing Space in Small Rooms
In apartments or small living rooms, a DIY wall-mounted TV stand can be a game changer. Use narrow, vertical panels or install storage beneath the TV for game consoles and remotes. One clever example is a city-dweller who used Ikea kitchen cabinets under a wall-mounted TV for a sleek, space-saving setup.
3.3 Personalizing Your Project
Don’t be afraid to show your personality. Paint your TV wall in an accent color, display family photos, or incorporate vintage finds as part of your design. The beauty of building your own wall-mounted TV stand is that it’s uniquely yours.
4. Real Cases and Common Mistakes to Avoid
It’s easy to get inspired online, but real-life projects often bring unexpected challenges. A popular Reddit thread featured a DIYer who, despite following a YouTube tutorial, found their TV leaning precariously because they’d misjudged stud locations. The lesson? Always double-check wall structure and never guess where your studs are.
Other common pitfalls include using the wrong type of screws, skipping the level, or not planning cable management—resulting in messy, tangled wires. To avoid these mistakes, make a checklist and take your time with each step.
If you’re unsure which products or methods are best for your space, Improvement offers detailed reviews and guides to help you make the right choice for your next DIY wall-mounted TV stand.
5. Expert Advice and Trusted Resources
While DIY wall-mounted TV stands are within reach for most homeowners, don’t hesitate to consult professionals if your wall material or TV is unusually heavy. Improvement frequently features expert interviews and real-world guides, making it easier to find solutions tailored to your space and budget.
The satisfaction of building your own TV stand is unbeatable, especially when you get to enjoy a cozy night in front of your perfectly mounted screen. Remember, careful planning and the right resources make all the difference. For personalized product recommendations, top-rated hardware, or inspiration from other successful DIYers, Improvement is your go-to resource.


