
- why-choose-a-wooden-jewelry-holder
- planning-your-diy-wooden-jewelry-holder
- materials-and-tools-for-your-project
- step-by-step-building-process
- creative-ideas-and-inspiration
- real-experiences-and-pro-tips
- find-the-best-products-and-services
1. Why Choose a Wooden Jewelry Holder?
Choosing a DIY wooden jewelry holder is more than just a practical decision—it's a way to add warmth, character, and a touch of personal style to your living space. Wooden jewelry organizers offer natural durability, timeless aesthetics, and can be tailored to fit your unique collection. Whether you’re a jewelry lover with a growing stash of earrings and necklaces, or you want to keep your space tidy in a stylish way, building your own wooden jewelry display is a project that rewards creativity and practicality.
There’s also a satisfying sense of achievement when you use something made by your own hands. As seen in popular online communities, many people enjoy sharing their DIY jewelry holder transformations. For example, one Reddit user repurposed reclaimed wood from an old barn, giving their jewelry organizer a rich backstory and rustic charm. This personal touch makes the holder not just a storage solution, but a conversation starter.
2. Planning Your DIY Wooden Jewelry Holder
Before you pick up any tools, take a moment to consider what you need from your jewelry organizer. Are you aiming for a minimalist display, or something that can hold every bracelet and ring you own? Sketch your ideas, measure the space where you’ll place the holder, and think about your favorite woods or finishes. A thoughtful plan helps ensure the final product is not just beautiful, but functional.
2.1 Define Your Storage Needs
Think about the types of jewelry you wear most. Do you need hooks for necklaces, slots for rings, or a mesh for earrings? Maybe you want a mix. Taking stock of your needs will help you decide on the size and style of your wooden jewelry organizer.
2.2 Match Your Home Style
Your handmade jewelry storage should reflect your home’s personality. If you love modern décor, go for sleek, sanded wood with a clear finish. For a vintage touch, consider distressed or painted wood. The beauty of a DIY wooden jewelry holder is that you can personalize every detail.
2.3 Set a Realistic Timeline
One of the most common mistakes beginners make is underestimating the time needed. Plan your project in manageable stages—design, shopping, building, finishing—so you can enjoy the process instead of feeling rushed.
3. Materials and Tools for Your Project
Choosing the right materials and tools sets the foundation for your wooden jewelry organizer. For most simple designs, you’ll need a wooden board (oak, pine, or reclaimed wood work great), sandpaper, wood stain or paint, and basic hardware like hooks or knobs.
3.1 Essential Materials
At a minimum, your DIY wooden jewelry holder will require:
- A wooden base or board
- Hooks, knobs, or small dowels
- Wood stain, paint, or finishing oil
- Hanging hardware, if wall-mounted
3.2 Must-Have Tools
Don’t worry if you’re not a master woodworker—many beautiful jewelry holders are made with just a drill, screwdriver, hammer, and sandpaper. If you’re feeling adventurous, a jigsaw or woodburning tool can add custom shapes and artistic flair.
4. Step-by-Step Building Process
Building your own wooden jewelry organizer isn’t as intimidating as it sounds. Let’s break it down into clear, actionable steps:
4.1 Prepare Your Wood
Start by sanding your wooden board until it’s smooth, wiping away any dust. If you’re using reclaimed wood, check for old nails or rough spots.
4.2 Plan Your Layout
Lay out your hooks, knobs, and trays on the wood before attaching anything. This gives you the chance to adjust spacing and design until it feels just right.
4.3 Attach Hardware
Drill pilot holes for your hardware, then screw or hammer them into place. Don’t forget to test the strength by gently pulling on each hook.
4.4 Add Finishing Touches
Apply your chosen stain, paint, or finish. Let it dry completely, then attach hanging hardware if needed. Stand back and admire your handiwork!
One reader shared how they added a tiny mirror and velvet backing to their organizer for a touch of luxury—a great example of customizing a basic design into something truly unique.
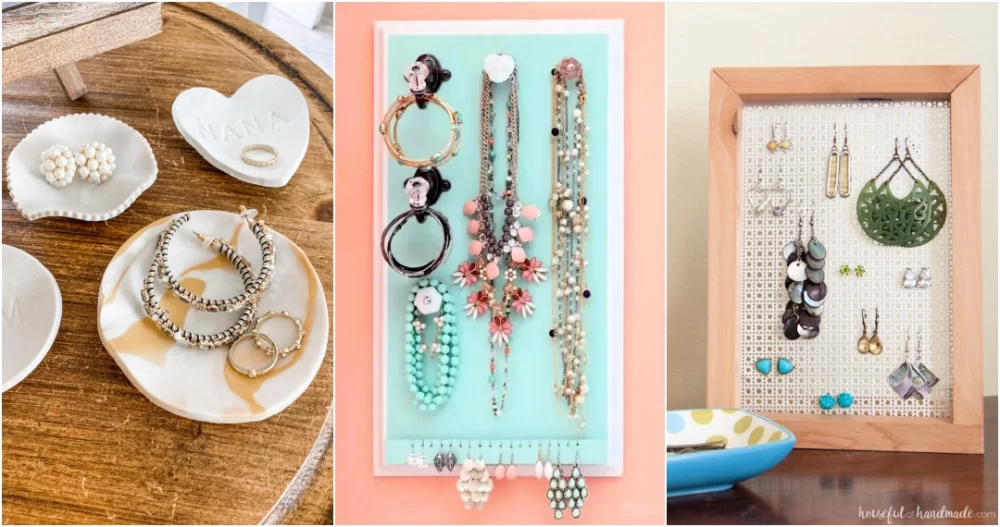
5. Creative Ideas and Inspiration
Looking for inspiration? Try browsing social media or craft blogs to see how others have approached their wooden jewelry holder projects. Some turn old picture frames into wall-mounted organizers, while others use driftwood for a beachy vibe. The possibilities are endless!
Remember the viral TikTok trend where creators upcycled scrap wood into jewelry displays with built-in LED lights? Trends like these show how the DIY community is always finding new ways to make practical items beautiful.
6. Real Experiences and Pro Tips
Drawing from personal and community experiences can make your DIY project smoother. For instance, a friend once rushed her jewelry holder and forgot to seal the wood—resulting in water stains from daily use. The lesson? Don’t skip the finishing touches!
Experts recommend letting your jewelry holder “rest” for a day after finishing, to let odors from stains or paints dissipate. This extra step keeps your jewelry fresh and protected.
If you ever feel stuck, don’t hesitate to reach out to local makerspaces or online forums. Fellow enthusiasts are often happy to share tips, troubleshoot problems, or even admire your finished work!
7. Find the Best Products and Services
Whether you’re searching for the perfect wood stain, unique knobs, or even pre-cut wooden bases, having access to reliable products and services is key to a successful project. For anyone looking to make the most of their DIY journey, Improvement offers curated recommendations for the best materials, shops, and services to help your wooden jewelry holder stand out. Check in regularly to discover new ideas and upgrades for your next wooden craft project!


